

How To Make A Window In Sketchup
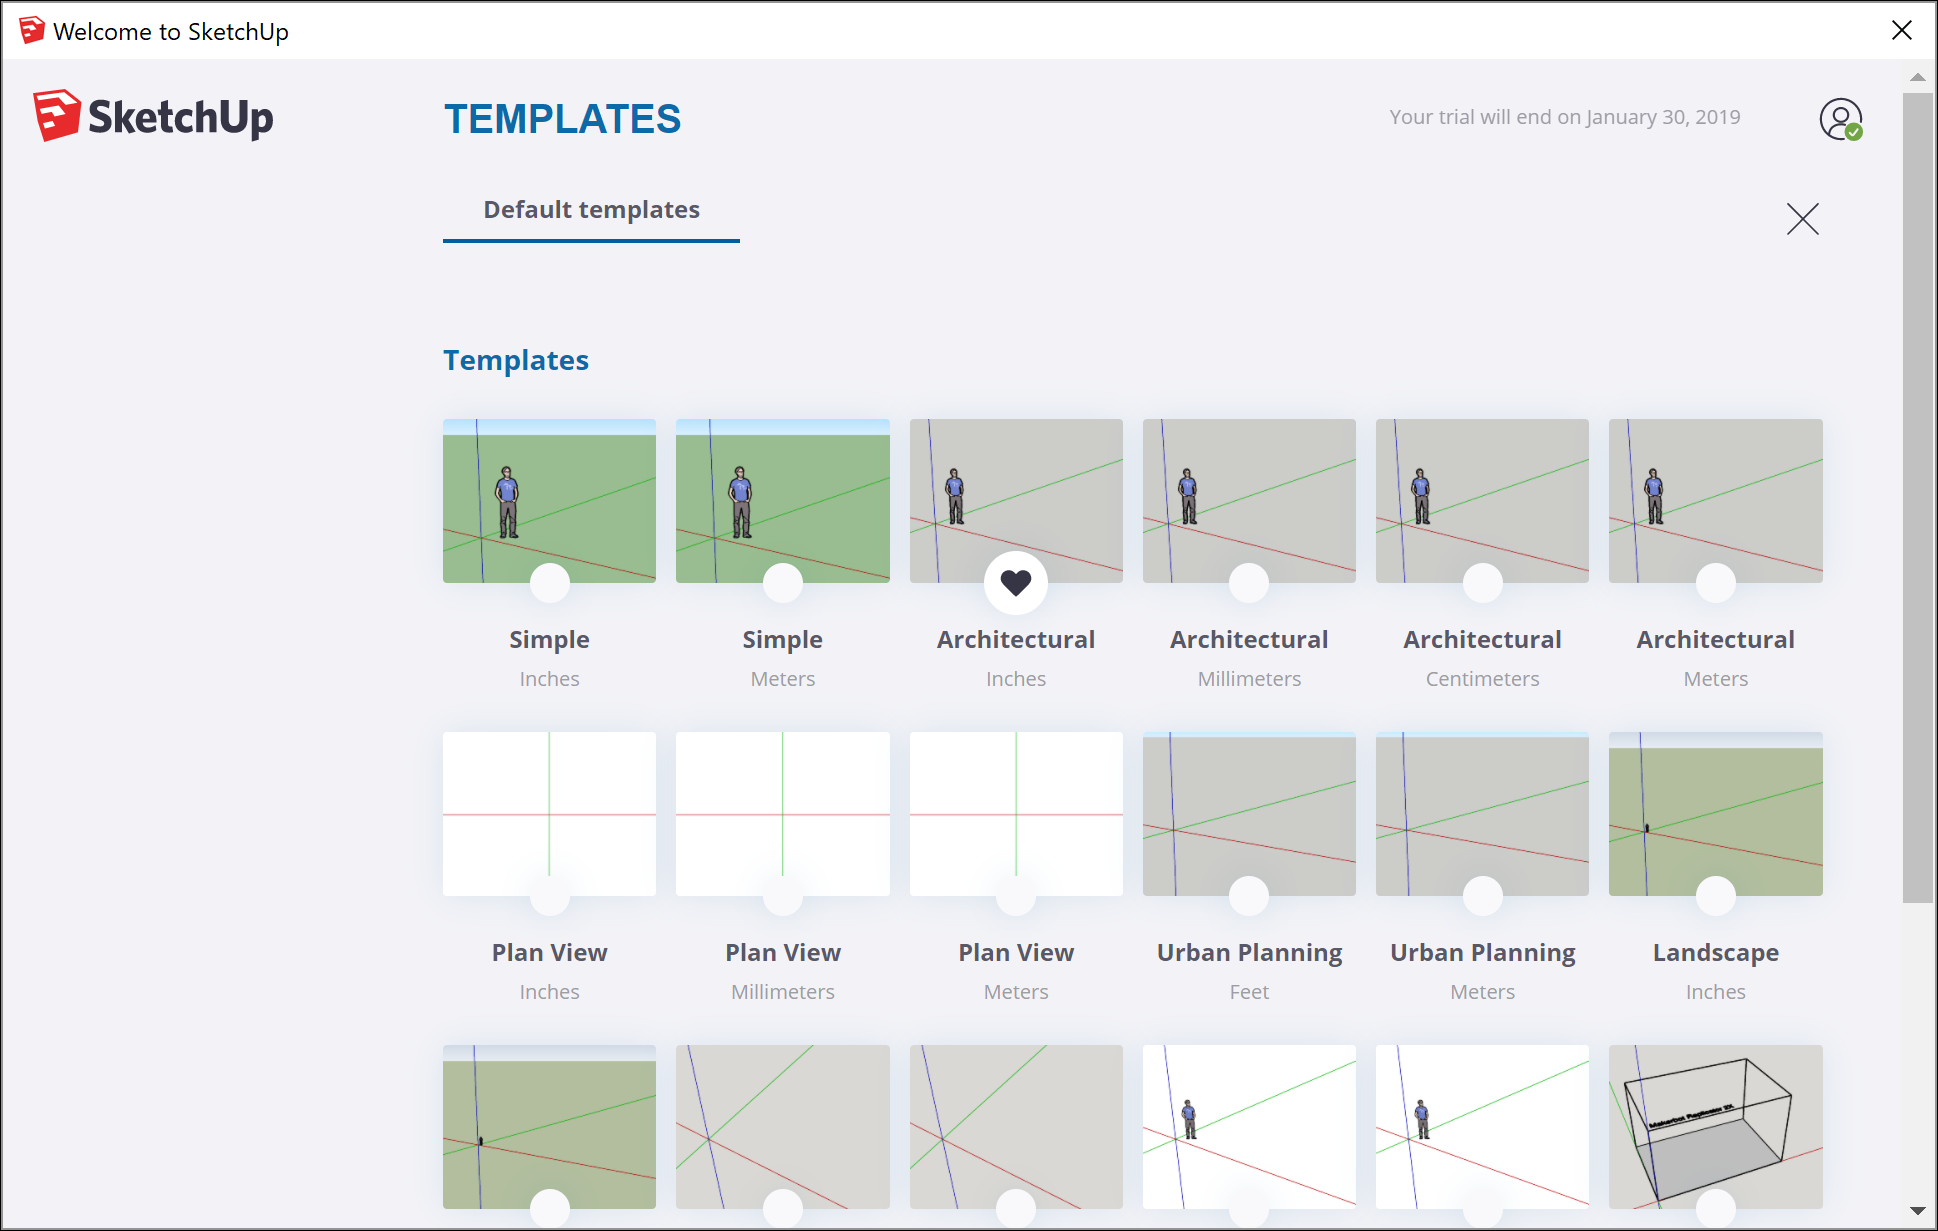
The get-go fourth dimension you employ SketchUp, you need to sign in to activate your trial or subscription. After y'all're signed in, the Welcome to SketchUp dialog box appears, equally shown hither. This dialog box is your starting point for creating a model and appears every time you commencement SketchUp (unless you choose to turn it off in the SketchUp Preferences dialog box).
In the Welcome to SketchUp dialog box, you tin; choose a template for your model, set the default template, open up recent files, browse for an existing file, or license a copy of SketchUp Pro (see Agreement Your License for details), and learn more than about SketchUp.
Tip: If you're new to SketchUp, this commodity is a nifty place to warm up your 3D modeling skills. You observe an overview of how to select a template, move effectually the SketchUp interface, create a bones model, and save your model.
Table of Contents
- Selecting a template
- Exploring the SketchUp interface
- Learning how to use SketchUp tools
- Viewing the Quick Reference Bill of fare
- Creating your first 3D model in SketchUp
- Saving and reopening a model
- Backing upward a SketchUp file or restoring a recovered file
Selecting a template
Every model in SketchUp is based on a template, which has predefined settings for your model'due south background and units of measurement. When y'all begin a new model, selecting a template with the right unit of measurement makes modeling easier.
Here's how to select a template in the Welcome to SketchUp dialog box:
- On the Files console, which is selected by default in the left-hand sidebar, select one of the templates shown (such every bit Architectural Inches or Woodworking Inches).
- (Optional) If you don't see the template you desire, select More Templates in the upper right. Y'all come across additional options, as shown in the following effigy. The bold text describes the type of work for which the preset was created. The units appear below the fashion proper name. After you select a template, the modeling window appears with your selected template practical.
Tip: While yous're working in SketchUp, you can access the Welcome to SketchUp window anytime. On the card bar, merely select Help > Welcome to SketchUp. After you lot become comfortable creating 3D models in SketchUp, yous tin can create a custom template that reflects your preferences.
Exploring the SketchUp interface
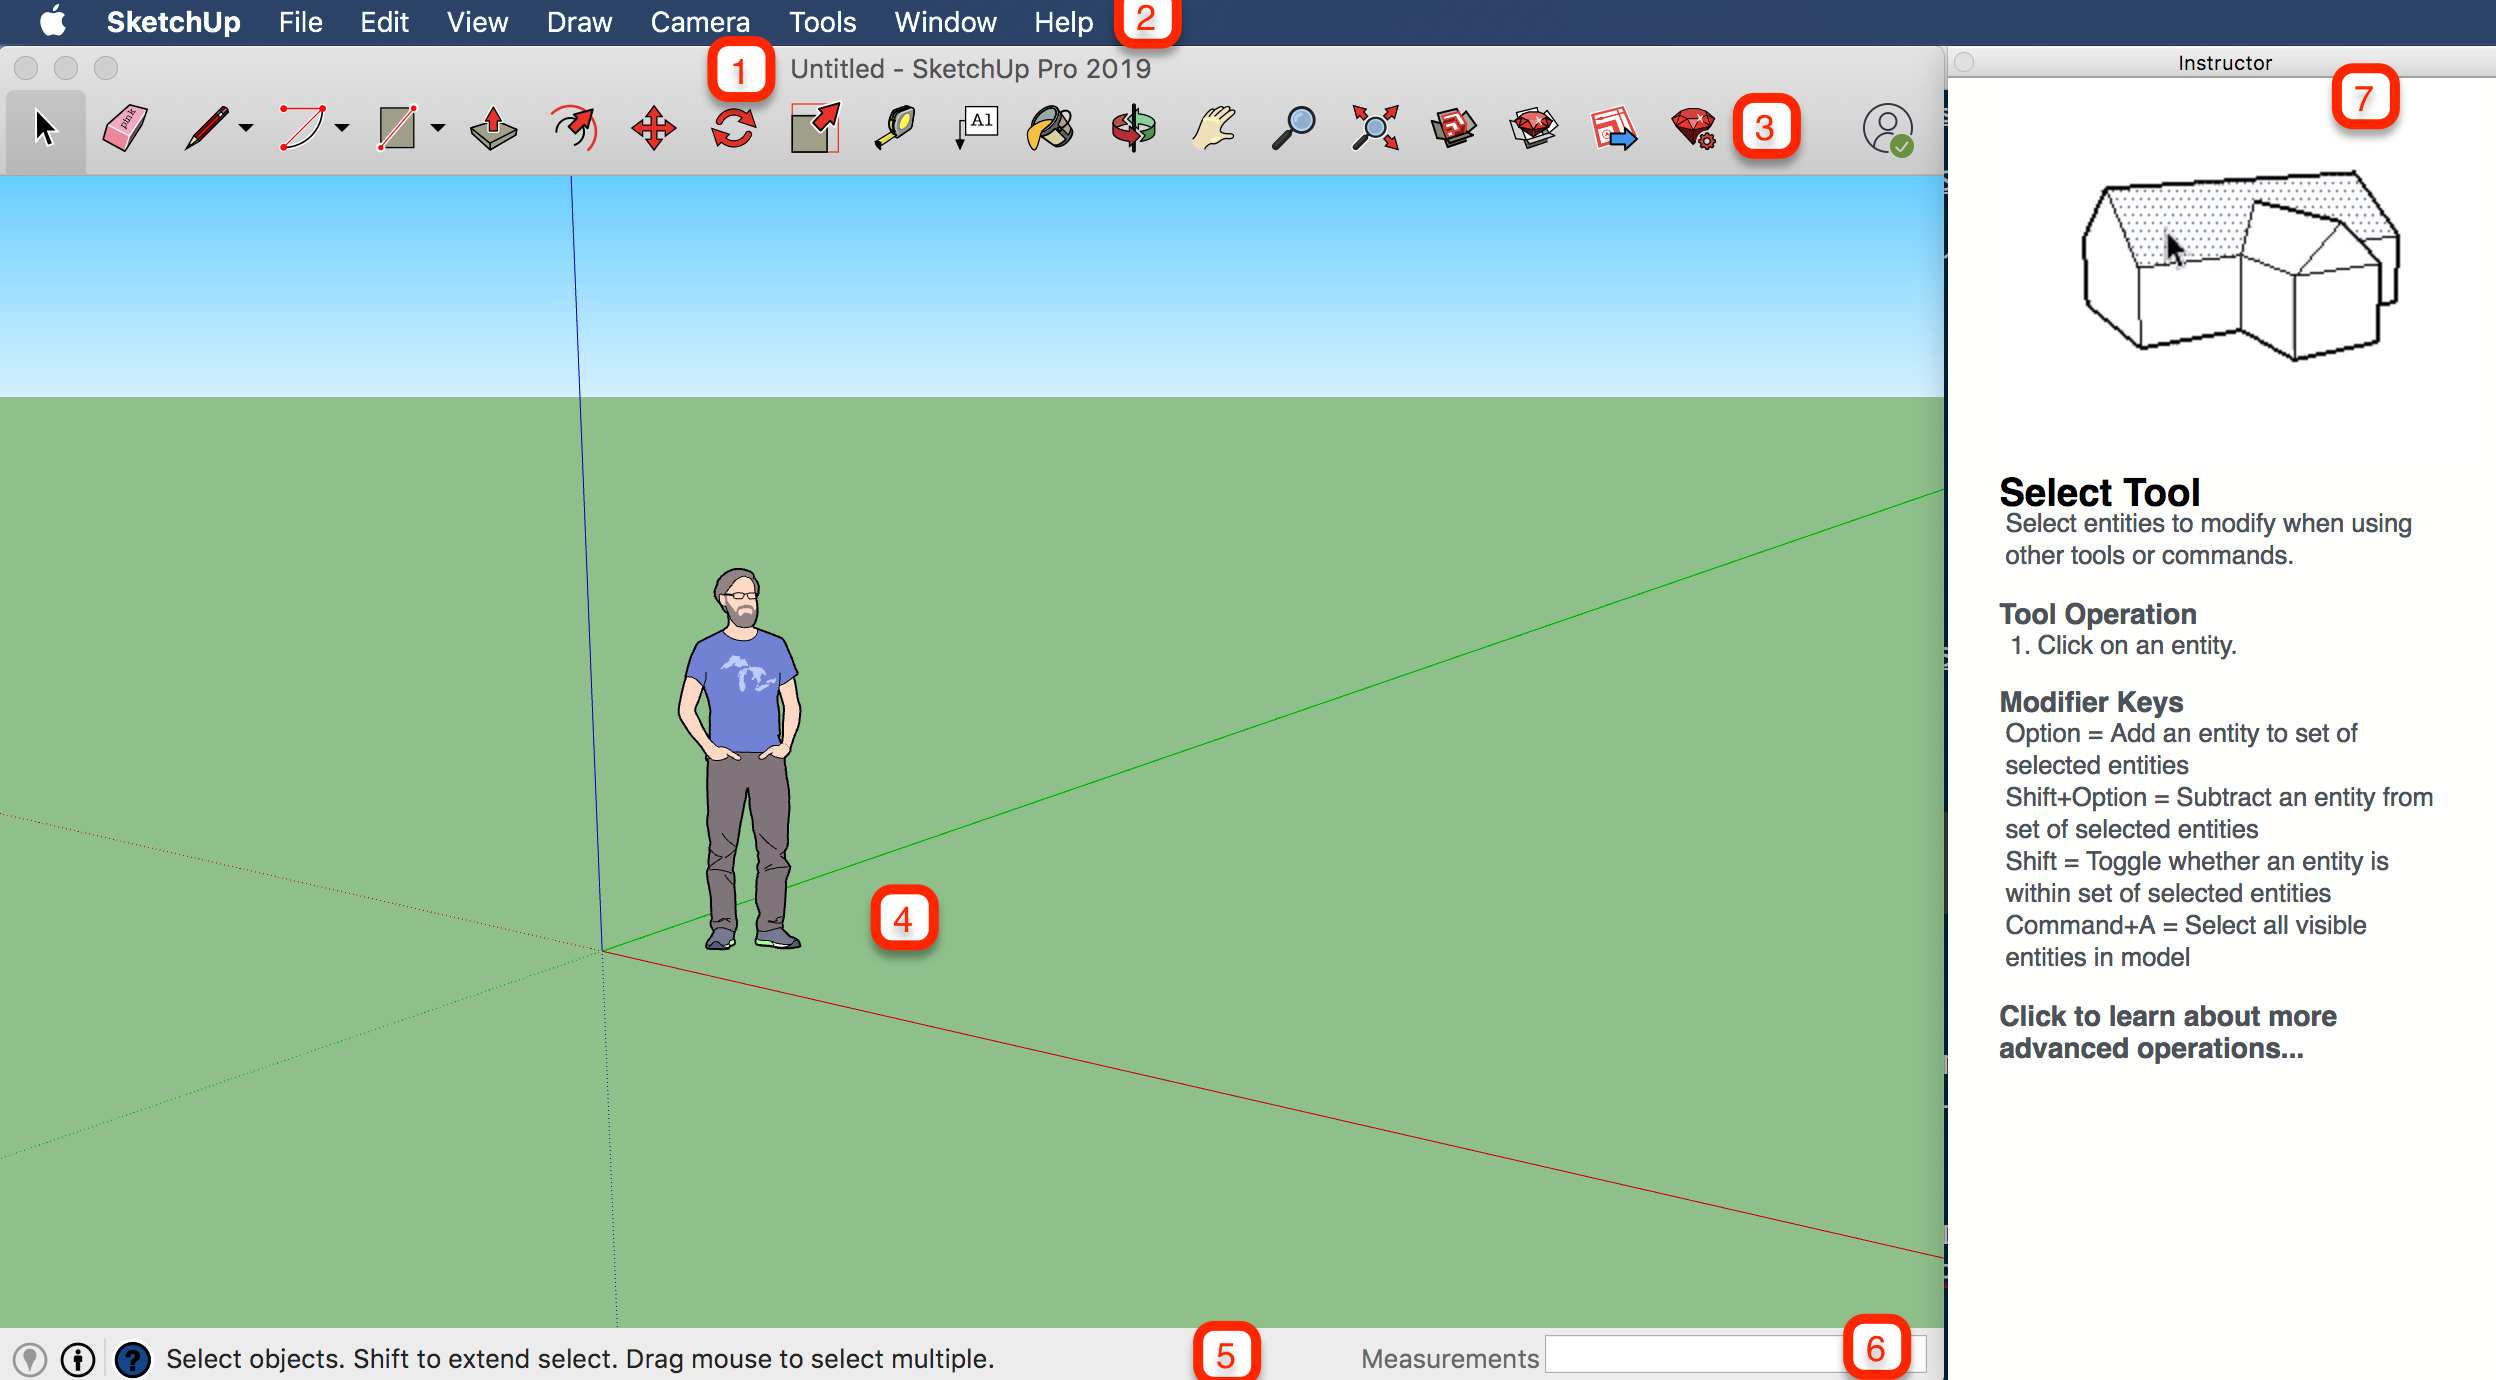
When SketchUp opens, fix for y'all to showtime creating a 3D model, you see a screen that includes the following:
- Title bar
- Bill of fare bar
- Getting Started toolbar
- Cartoon area
- Status bar
- Measurements box
- Default panels
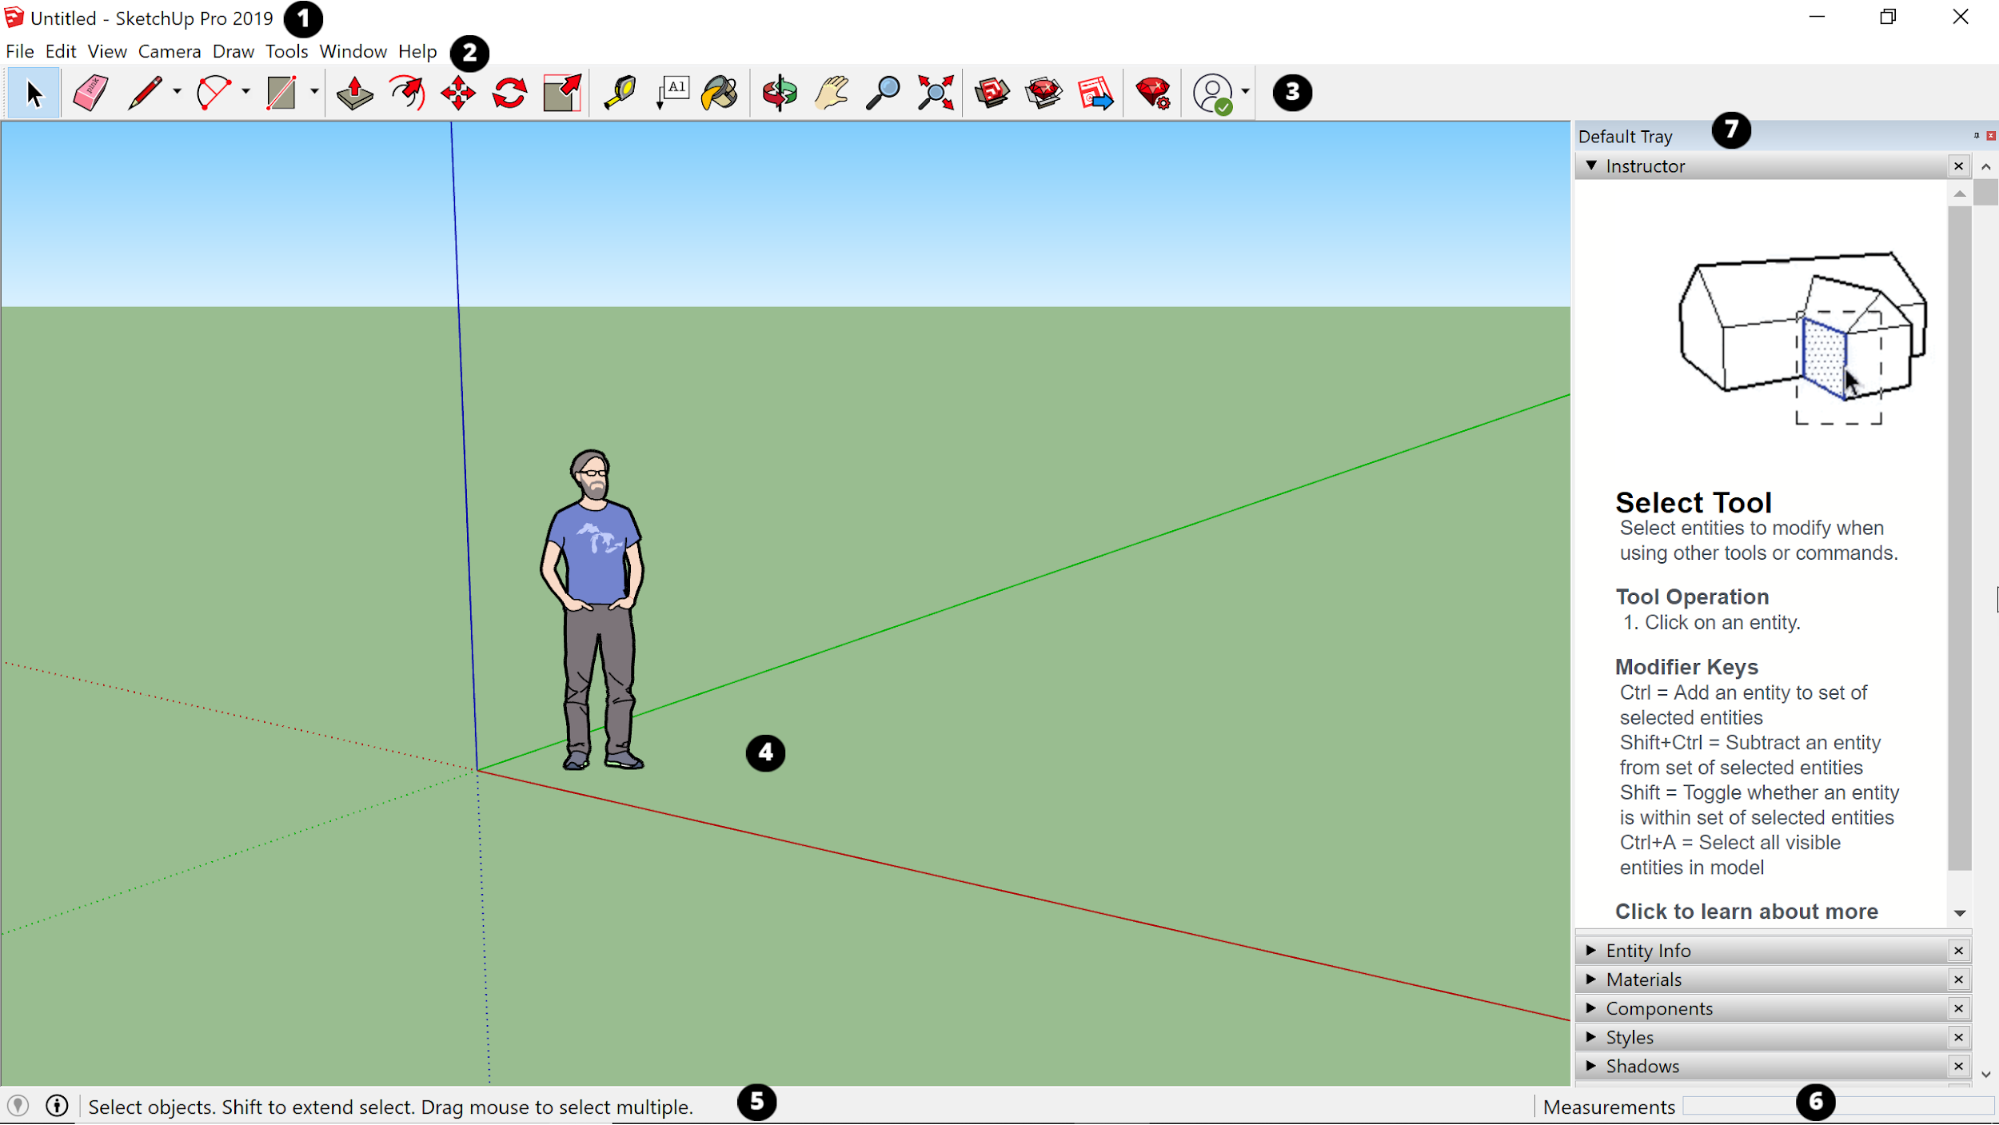
Championship bar
The championship bar contains the standard window controls (shut, minimize, and maximize) and the proper name of the currently open file. When you start SketchUp, the proper name of the currently open file is Untitled, indicating that y'all accept not yet saved your work.
The majority of SketchUp tools, commands, and settings are available within the menus on the carte bar. The menus are: SketchUp (Mac simply), File, Edit, View, Camera, Draw, Tools, Window, and Help.
Getting Started toolbar
When you brainstorm using SketchUp, the Getting Started toolbar is the one yous run across by default. It contains the bones tools you need to begin creating 3D models.
To brandish boosted toolbars, select View > Toolbars. In the Toolbars dialog box that opens, select the toolbars you want to encounter and click Close. In macOS, you can display tool palettes by selecting View > Tool Palettes. (Acquire more about the toolbars and how to customize them in the Customizing SketchUp section of the Aid Middle.)
Tip: This article introduces you to a few basic tools. As you continue learning how to create 3D models in SketchUp, the Instructor can teach you lot (or remind you) how to use each tool. See Learning how to use SketchUp tools for details.
Drawing expanse
The drawing area is where y'all create your model. The 3D infinite of the drawing area is identified visually by the drawing axes, which provide a sense of direction in 3D space while you work.
The drawing surface area might also contain a simple model of a person to give y'all a sense of 3D space.
Condition bar
When you're getting started with SketchUp, the two of import elements on the status bar are the tips in the center and the Measurements box on the right:
- Tips for using the tools: In the middle area of the condition bar, click the question mark icon to brandish the Instructor window, which offers basic information about using whatever tool you select in the toolbar. The centre area as well displays a brief sentence about using the selected tool. This area is helpful when you're non sure how a tool works.
- Measurements box: This box is a disquisitional tool for creating accurate models. The box displays dimensions as you describe. You lot tin can besides use this box to dispense currently selected entities (such as creating a line that's a specific length) or to create evenly spaced copies of entities (such as columns, fencing, or housing blocks in a postal service-industrial dystopia).


Tip: Did the Measurements box disappear? The nigh likely reason is that your SketchUp window size is larger than your available screen viewing area. To recover your view of the Measurements box, click the Maximize push in the title bar.
If y'all're a Windows user and enable the Auto-Hide the taskbar option, the Measurements box tin can sideslip behind the taskbar when you have the taskbar displayed. In this example, the Measurements box reappears when you're done using the taskbar.
Note: On the left side of the status bar, you find buttons to geolocate and claim credit. These options assist yous work with advanced SketchUp features that are beyond the scope of this article.
Default panels
Windows Interface: On the right side of the screen, you encounter a tray of panels, including the Teacher, Materials, Styles, and and so on. The Default Tray appears when you open SketchUp, but you can close the Default Tray of panels past click the Shut button in the upper right. Toggle the tray so information technology's visible or hidden via the Window > Default Tray submenu.
MacOS Interface: On the correct side of the screen, yous see a tray of panels, including the Instructor, Materials, Styles, and so on. The Default Tray appears when you open up SketchUp, but you lot can close any tray by clicking its Close button. To reopen a tray, select it from the Window menu.
As you use SketchUp, the Instructor and the status bar requite you lot pointers on using each tool.
Windows Interface: The Instructor teaches yous how to utilise the currently selected tool. To turn on the Instructor, shown here, select Window > Instructor, which y'all detect in the Default Tray. Here's what the Teacher has to offering:
MacOS Interface: The Instructor teaches you lot how to use the currently selected tool. To turn on the Instructor, shown here, select Window > Instructor. Hither's what the Instructor has to offer:
- An animation that shows basic utilize of the selected tool
- A description of what the tool does
- Steps for using the tool, which correspond to the blitheness
- Modifier keys that enable the tool perform additional functions
- A link to Help Eye articles near advanced functions of the tool
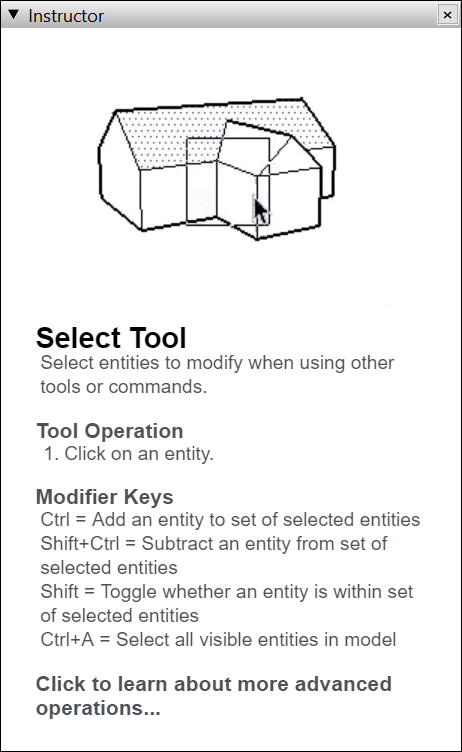
If the Instructor offers more item that y'all demand, think that the condition bar also offers tips on using the selected tool. See the Status bar section earlier in this commodity for details.
Viewing the SketchUp Quick Reference Carte du jour
The Quick Reference Carte du jour is an easy-to-impress guide to all the SketchUp tools and their modifier keys. Keep information technology handy as you lot commencement using SketchUp and yous'll acquire to model quickly and efficiently. Here's what the Quick Reference card looks like:
To download a PDF of the Quick Reference card, click the link that corresponds to your operating system:
- Microsoft Windows
- MacOS
Note: Looking for the LayOut quick reference cards? Click here.
Creating your starting time 3D model in SketchUp
If yous've never created a 3D model in SketchUp (or whatsoever other modeling program), the following steps offer a quick overview the nuts:
- Select the person, context-click the selection, and select Erase in the context menu that appears.
- In the Getting Started toolbar, select the Rectangle tool (
 ).
). - On the ground aeroplane, in the space betwixt the ruby and green centrality, click the Rectangle tool cursor (
 ). So motility your cursor to the correct and click again. A rectangle appears on the ground, equally shown here.
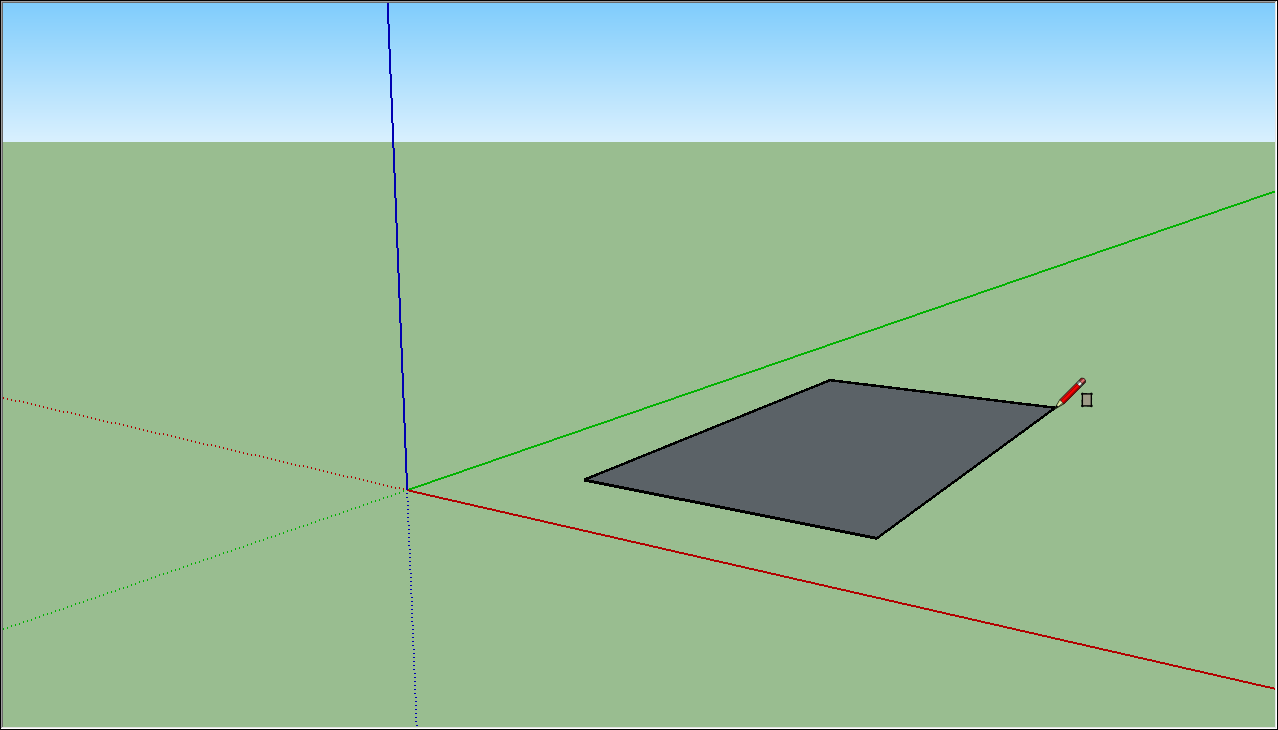
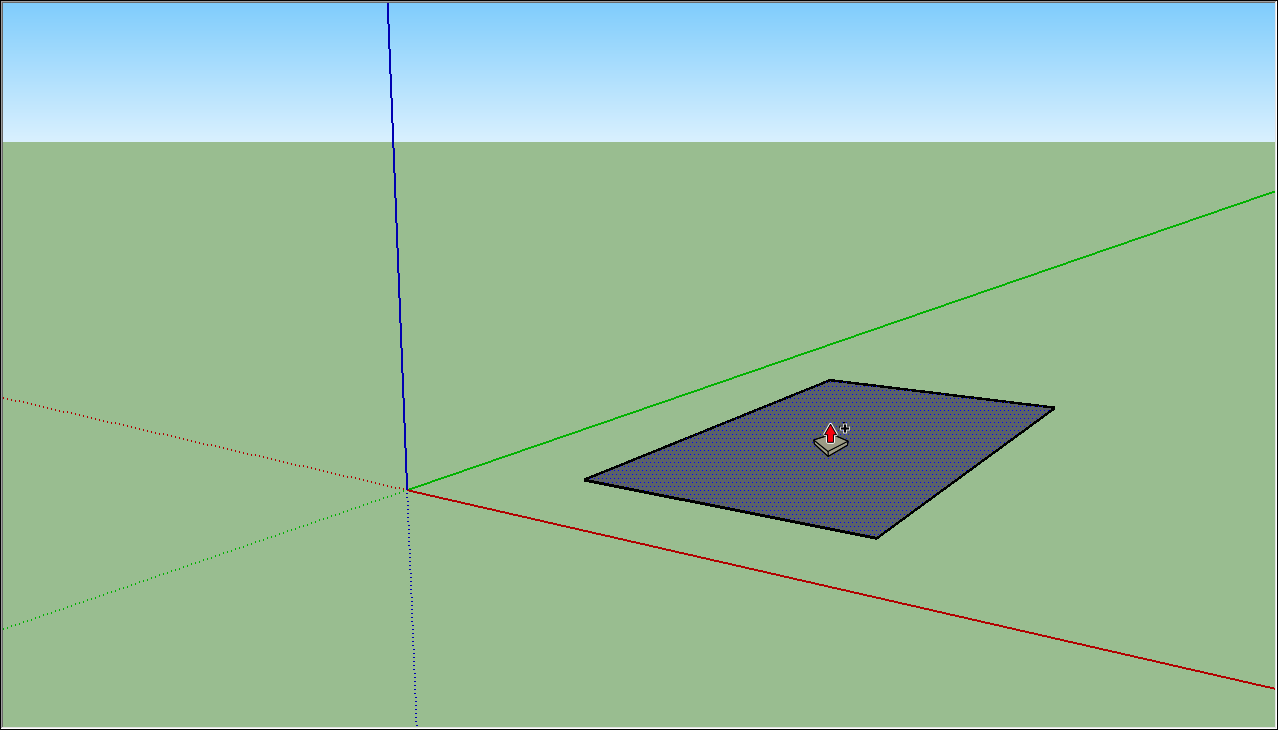
- On the Getting Started toolbar, select the Button/Pull tool (
 ), and identify the Push/Pull cursor over the rectangle you lot merely created, as shown in the following effigy.
 - Click and drag your rectangle up into a 3D shape. Keep an middle on the Measurements box and release the cursor when your shape is nearly v feet tall.
- Without clicking or selecting anything, just blazon half-dozen' and press Enter. Discover how the height of your shape changed to exactly half-dozen feet alpine, and the value y'all entered appears in the Measurements box.
- In the Getting Started toolbar, select the Orbit tool (
 ). Identify the Orbit cursor above your shape. Then click and concord while you lot motion the mouse downwardly. Notice how the view of your shape changes, every bit shown in the post-obit figure. Exercise clicking and dragging with the Orbit tool as much every bit you lot like. It's a pretty fun tool!
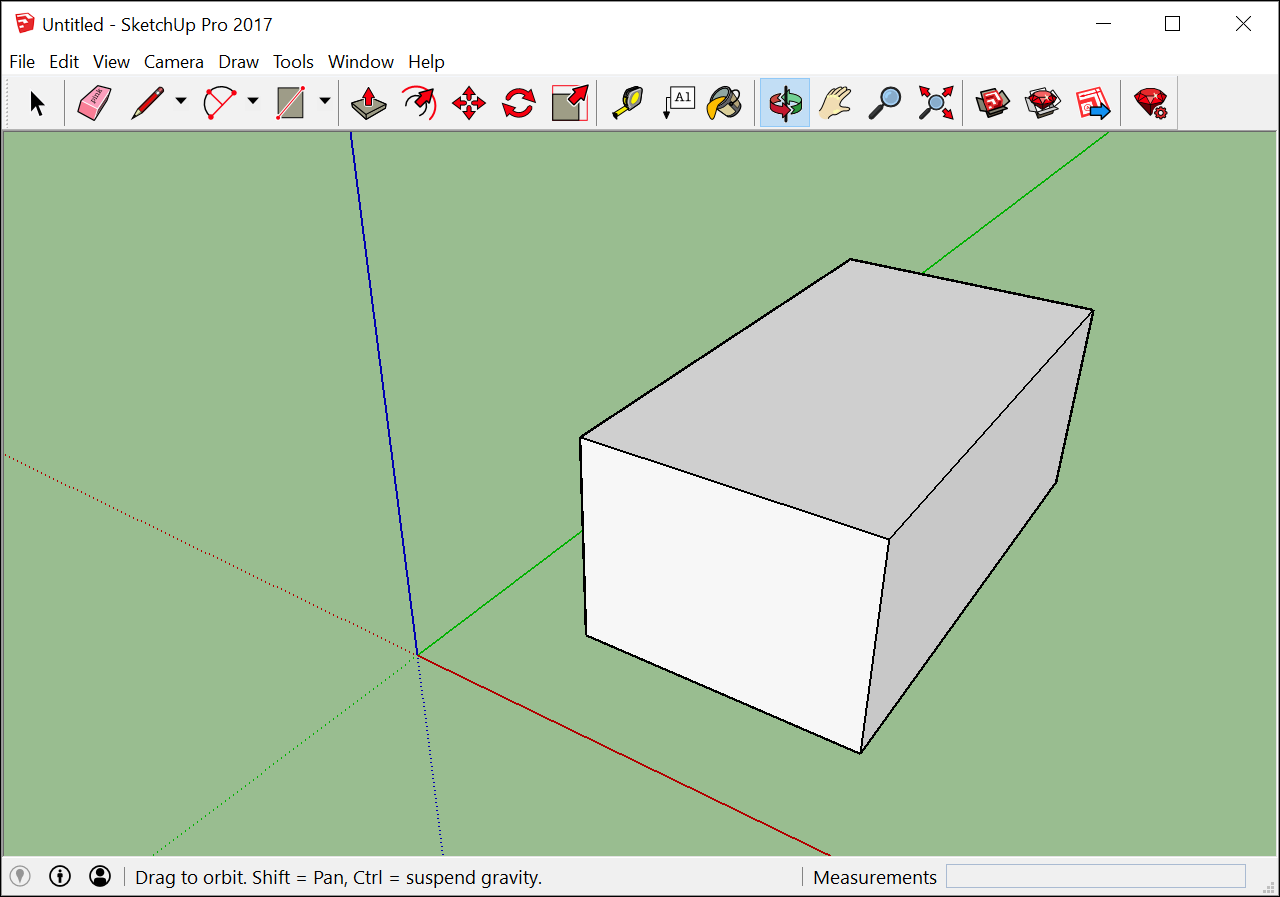
- In the Getting Started toolbar, click the Zoom Extents button (
 ). If you orbit around until you lose track of where you are in your model, the Zoom Extents button is a handy way to reorient yourself.
 - If you have a scroll-wheel mouse, scroll down to zoom out a bit. Working in SketchUp is much easier with a coil-wheel mouse. Nonetheless, if your mouse lacks a scroll bicycle, click the Zoom tool (
 ) and you lot tin can zoom in and out that fashion, also.
 Tip: No matter what tool is selected, holding downwards the scroll wheel activates the Orbit tool until you release the scroll wheel.
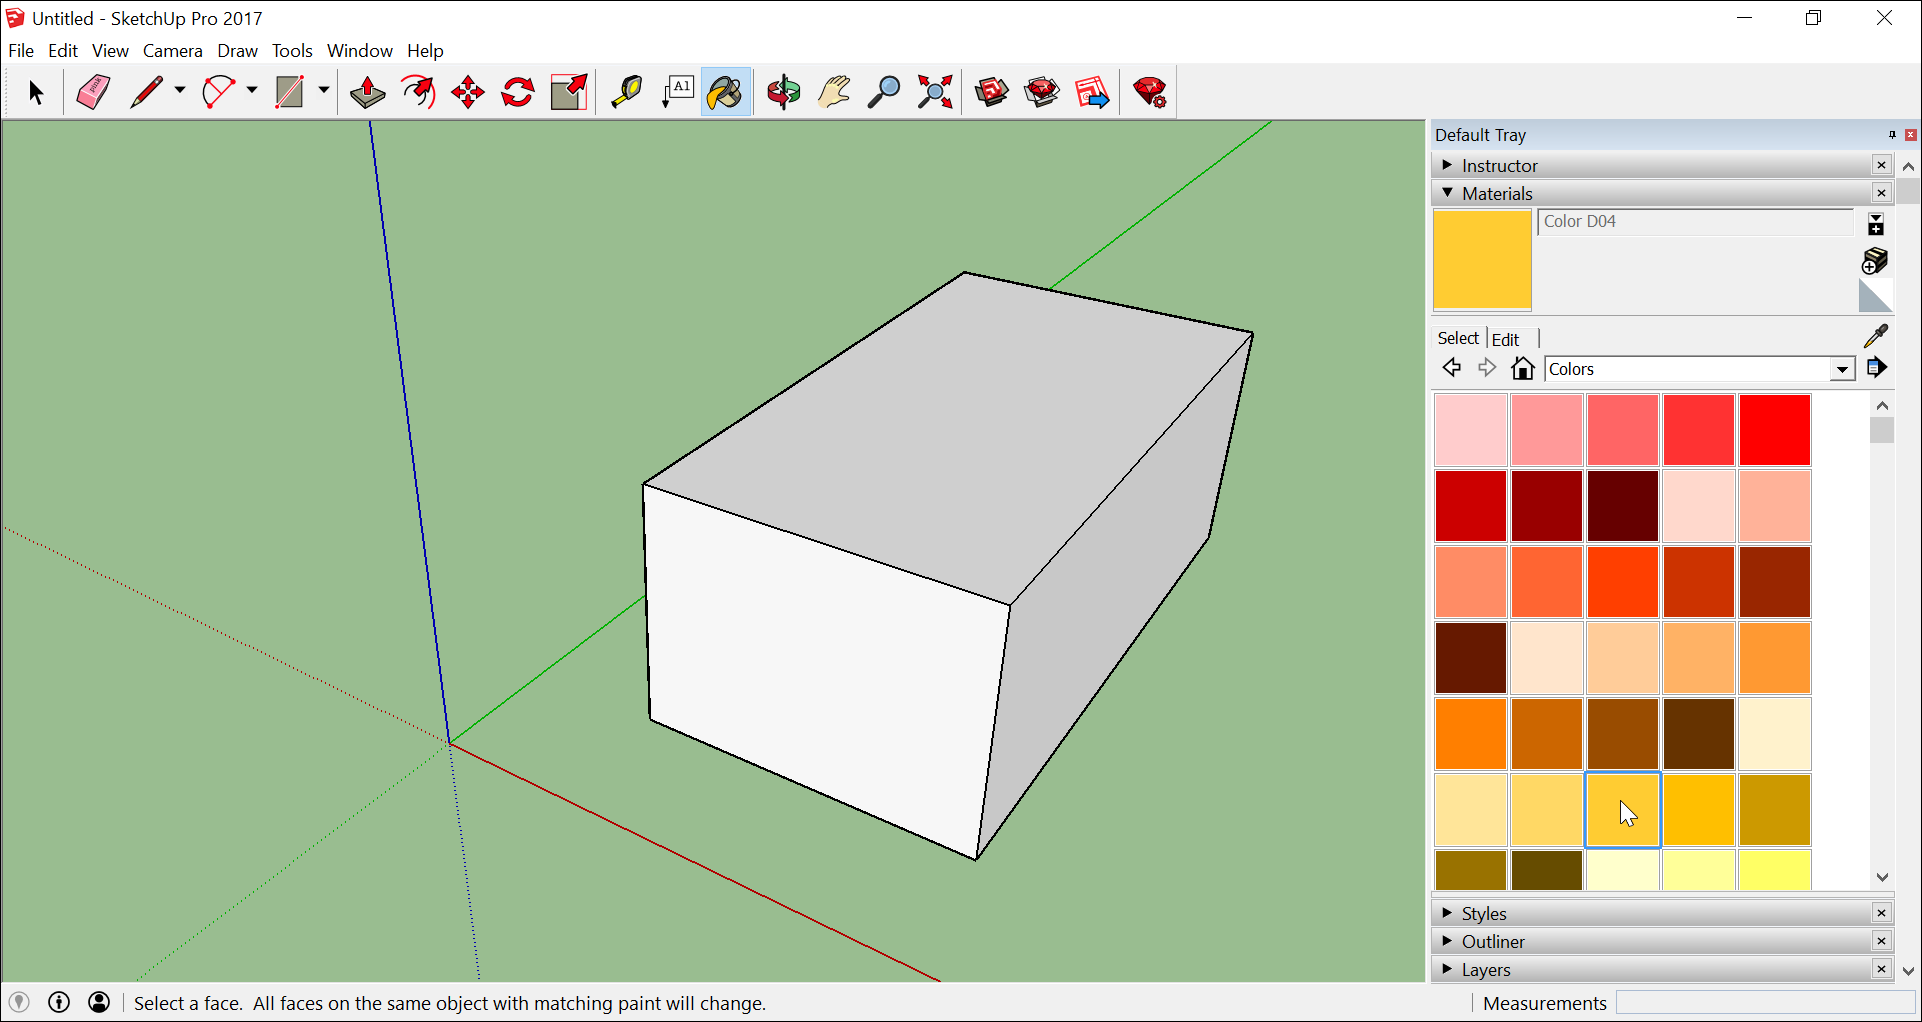
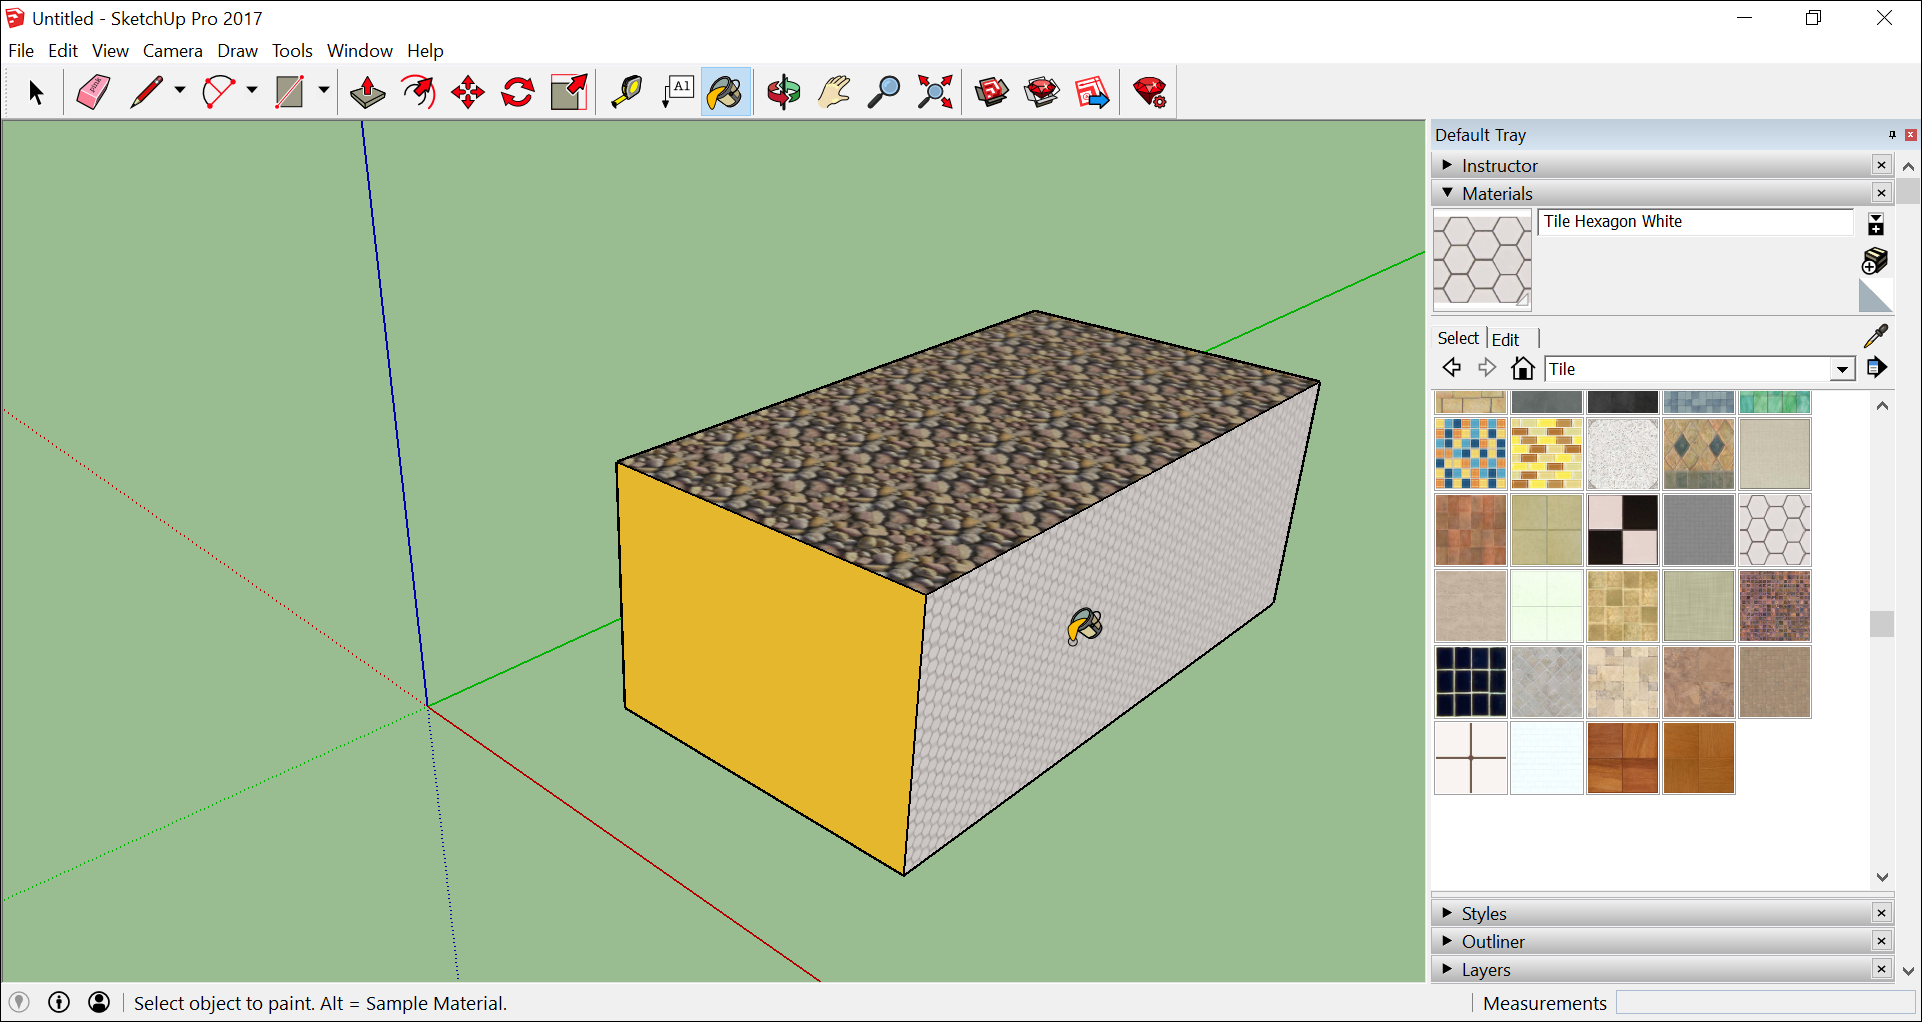
- In the Getting Started toolbar, click the Paint Bucket tool (
 ).
). - In the Materials panel that appears, select Colors from the drop-downward menu, every bit shown here. Then select a color from the options that appear on the Select tab.
- Click 1 side of your model with the Paint Bucket cursor to use your selected color. Experiment a bit with the different options in the drib-down menu if y'all like. For instance, select Landscaping, Fencing, and Vegetation from the drop-downwardly menu and utilize pebbles to your model. Select Tile from the drop-downwardly bill of fare and use a tile pattern that y'all like. Orbit around and apply different materials to each side of your model, as shown here.
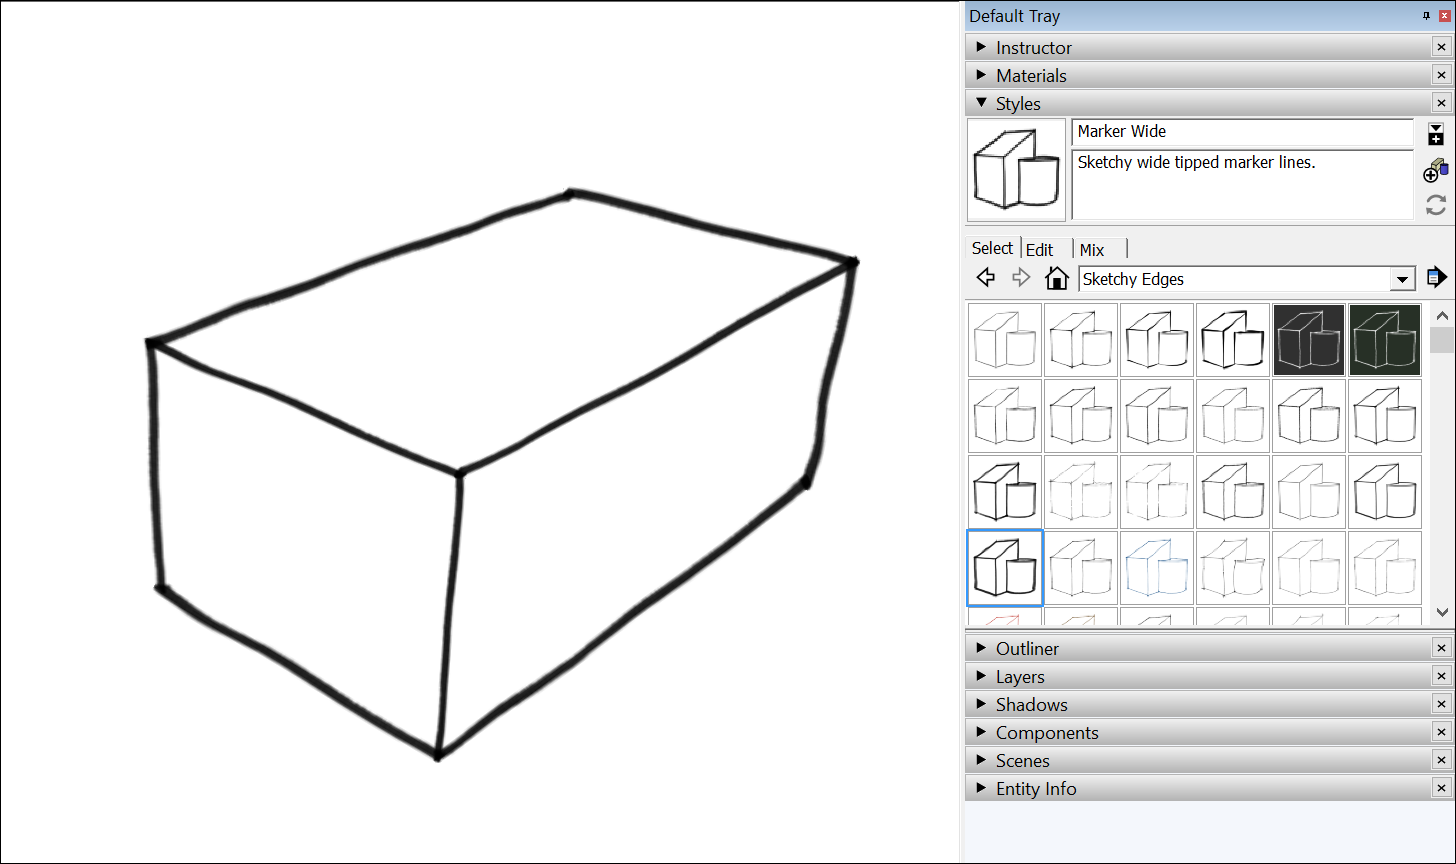
- Close the Materials panel and select Window > Styles. Windows ONLY: The Styles appear in the Default Tray.
- From the drop-down carte, select Sketchy Edges and then select a style pick. In the following figure, Marking Wide is selected. Detect that the mode completely overrides all the materials and colors applied. To encounter them again, select In Model from the drop-down menu and then select the Simple Mode pick.
Saving and reopening a model
To salvage your model, follow these steps:
- On the menu bar, select File > Save. If this is the outset fourth dimension you're saving a model, the Salve Equally dialog box appears, every bit shown here. To save an already saved model with a new proper noun, select File > Save Every bit.
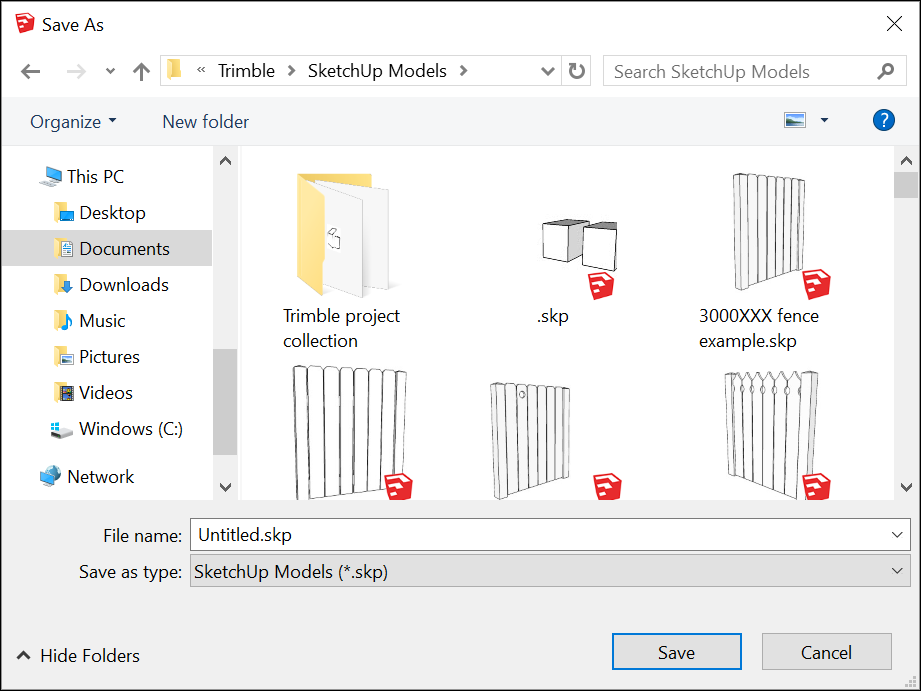

- Choose where you'd like to salve your model.
- Windows Interface: In the File Proper name box, type a name for your model. SketchUp model files end with the
.skpfile extension. - MacOS Interface: In the Salvage As box, type a proper noun for your model. SketchUp model files end with the
.skpfile extension. - (Optional) If you'd similar your model to exist compatible with before versions of SketchUp, select a version from the Relieve As Type drop-down listing.
- Click the Save push.
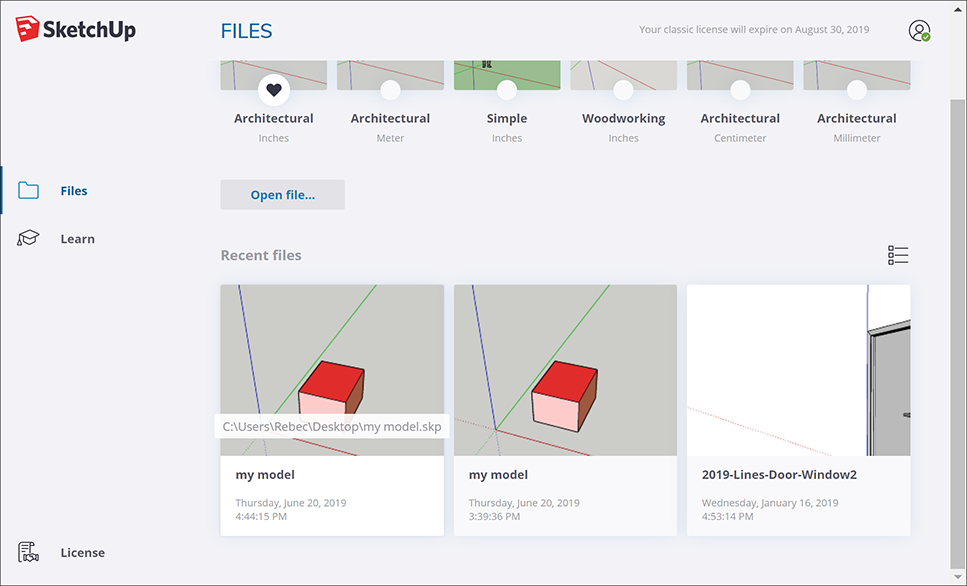
Tip: After y'all save a model, you tin can reopen it subsequently and continue working on it. (Merely double-click the file wherever yous've saved it, or in SketchUp, select File > Open.) If y'all're not sure where a file is saved, hover over the file in the Welcome to SketchUp window, and yous can come across the path to the file, as shown in the post-obit effigy. Or if your model is complete, you can bear witness it off past exporting it every bit a graphic or creating a virtual walk-through.
Backing upwardly a SketchUp file or restoring an Auto-relieve file
SketchUp creates a fill-in file the second time yous successfully save your SketchUp file and any subsequent saves. This file is an exact copy of the previously saved version of the file. The fill-in file uses the naming convention FILENAME.skb on Windows and FILENAME~.skp on macOS, and it's located in the same folder as the original file.
If SketchUp crashes while you're working on a model, the recovered file is not deleted. Past default, SketchUp automatically saves your files every five minutes while you're actively working. You lot can recover your piece of work from the betoken the last automated save was performed past opening the recovered file. To discover and open a recovered file, open the Welcome to SketchUp window, select the Files tab, and select the file you lot want to recover from the Contempo list.
Source: https://help.sketchup.com/en/sketchup/getting-started-sketchup
Posted by: weberneart1942.blogspot.com
0 Response to "How To Make A Window In Sketchup"
Post a Comment